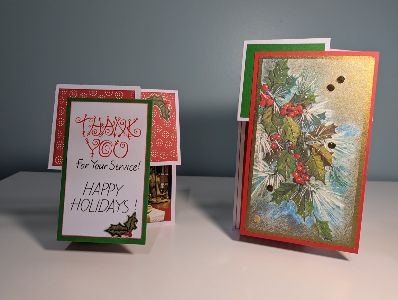
Above: example of small card on the left, large card on the right
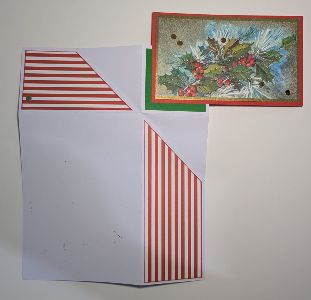
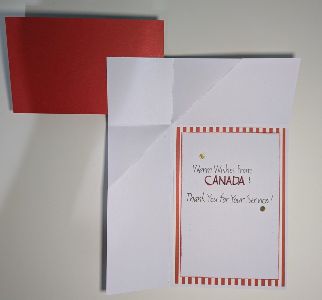
Below: front of card (left), inside of card (right)
As part of our Holiday Cards for the Military initiative, the Bow Valley Calligraphy Guild is proud to create heartfelt handmade cards for military personnel stationed away from home this season. Each card in this five-part series features a unique design, hand-lettered message, and a matching envelope — crafted with love, creativity, and gratitude.
Challenge 4 of 5 – Corner Fold Card
This week, we are thrilled to share Summer Challenge #4: The Corner Fold Card, designed by the always- creative Lynn Slevinsky. This eye-catching design is perfect for recycling old holiday cards, wrapping paper, or scrapbook scraps- and it's full of possibilities for personalization!
Suggested Supplies
(Feel free to get creative- use what you have on hand!)
- Card Stock (8.5" x 11”) plus smaller pieces in contrasting colours
- Envelope to match card size (or handmade envelope)
- Decorative papers (recycled Christmas cards, wrapping paper, or double-sided paper)
- Markers or calligraphy pens
- Glue or preferred adhesive
No glitter, confetti, or strong scents please.
Step-by-Step Instructions
Step 1: Cut & Prep Your Papers (see diagram below)
-
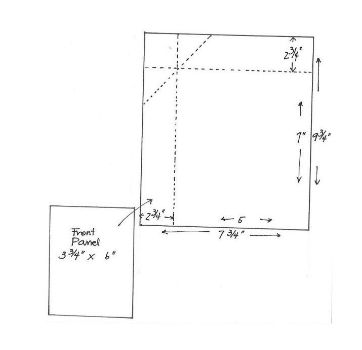
Cut main cardstock to 7.75" x 9.75"
-
Score cardstock as per the provided diagram below and crease all the folds firmly
-
Cut front panel (contrasting colour) to 3.75" x 6" (see example below and diagram above)
-
Cut decorative side panels and corner square to fit your design (see example below)
.jpg)
-
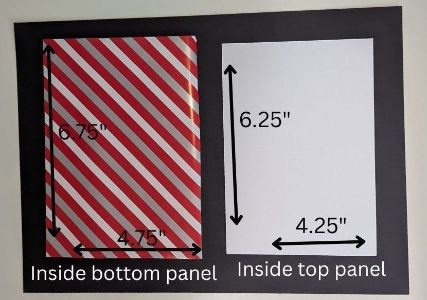
Cut inside bottom panel to 4.75" x 6.75" (see example below)
-
Cut inside top panel (for your message) to 4.25" x 6.25" (see example below)
Step 2: Assemble the Card
-
Attach the decorative papers to the front
-
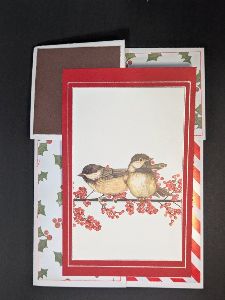
Add recycled card piece to the front panel
-
Position the front panel so its upper corner aligns with the folded square corner
-
Once the decorative pieces have been added, carefully fold the valley folds toward the inside of the card and crease firmly
Below: front of card
.jpg)
Below: front panel with recycled card
-
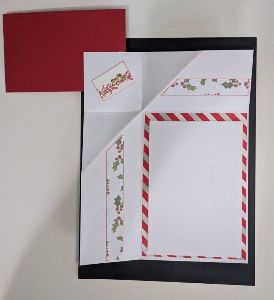
Decorate the inside with your chosen papers
-
Optional: Add extra strips of decorative papers to the inside- a great way to use up scraps!
Below: inside of card
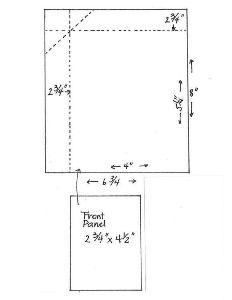
Creative Tip: Lynn has provided guidelines for two card sizes this week, but the size of the panels is entirely up to you- adjust to suit your illustration or message! You can place the illustration on the front or inside and even write your message on the back. Embellish with small cutouts from recycled materials or punch 1/4" circles from metallic paper for a touch of sparkle. So many variations to explore! Watch our IG for a small size example.
Diagram of smaller card size:
Step 3: Write Your Message
Write your message on the top inside panel, then attach it once you are happy with the layout.
Below: inside of card with message
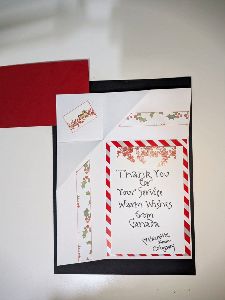
Using your favourite calligraphy tools, letter a thoughtful holiday message on the centre panel. Do sign your first name. You may optionally include "Bow Valley Calligraphy Guild member, Calgary, Canada" on the back of each card.
Popular greetings:
-
Wishing You Peace This Season
-
With Gratitude & Warmth
-
Happy Holidays from the Home Front
-
Warm wishes from Canada
-
Warm wishes from a fellow Canadian
-
Thank you for your service and warm wishes from Canada...
-
Your service is appreciated by me and by many. Warm wishes...
-
Handmade with gratitude and warm wishes...
-
Thank you for your gift of service. Warm wishes from Calgary, Canada...
-
Gratitude and warm wishes from Canada
Writing Suggestions
- Keep your tone warm, positive, and secular (e.g., “Thinking of you with thanks this holiday season.”)
- Avoid specific references to politics, religion, or combat
- Always write legibly and spell-check your message
Lynn Slevinsky, a BVCG member has graciously offered the following lettering style to use for the challenge. It is a fun, monoline alphabet that is perfect for holiday cards!
Holiday Lettering Guideline
Step 4: Create or Decorate the Envelope
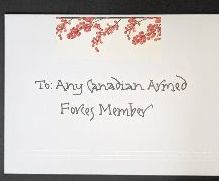
On the front of the envelope, write:
To: Any Canadian Armed Forces Member
Optional: add a border, small icon, or patriotic detail. Try adding doodles to match a design element from the recycled card (i.e. snowflakes, etc).
Step 5: Getting Cards Ready for Drop-Off or Mailing
Stack cards gently with their envelopes — let's make mailing easy! Place each card under the envelope flap (not inside the envelope), and please don't seal the envelopes. Click here for where you can drop off or send your cards.
Share Your Work & Tag Us!
Finished your design? We’d love to see! Email us here for us to post on the BVCG's socials. Or share on your socials and tag us. Tag @bowvalleycalligraphy and use #CardsForTroops or #CalligraphyForACause
Coming Up Next in the Summer Challenge:
Stay tuned for our final card design, releasing August 26th!
Let's keep the creativity flowing and brighten a soldier's season- one handmade card at a time.
